The 5000cs quattro is larger inside, more comfortable , more trunk space (room for full spare) and yet lighter than a new equivalent sized model Audi.
The 5000 csq has REAL quattro based on mechanical design and components and race proven UR quattro requiring a manual transmission. It has proven itself to be durable and requiring little maintenance and no doubt of its operation.
New Audi Quattro was designed for automatic transmission drivers and is based on fluid coupling activation with computer control.
5000 series uses a taller tire sidewall for better tire traction better absorption over rough surfaces and driver feel during cornering. Tire prices are reasonable. New audi has succumbed to expensive ultra low tire sidewall for appearance and sales, and has 1/2 the clearance over snow. Requires a dedicated snow tire , 5000 quattro operates fine on all season tire of 60 series. In the event of a sudden and complete tire failure , original quattro will "back feed" the drive system to slow down each wheel to comply with reduced rotation of failed tire/wheel. This results in retaining control during tire failure. Original quattro operates not only in forward drive motion but also allows for down shifting on snow/ice to mechanically slow down the entire vehicle, evenly retarding and rotating each wheel without relying totally on the brakes.
The in line 5 cylinder with radiator located to the side allows for easy engine access work without the need for pulling the engine. Accomplished by simply removing the front bumper, cross panel , disconnecting lighting and trim pieces. Exposes the entire engine front and side for repair and can even allow for engine operation during repair with radiator and intercooler in place.
High speed crash : New audi is fitted with numerous air bags, 5000 series is equipped with Procon - Ten crash system.
Low speed crash head to head: The 5000 series verses 5000 dollars: The 5000 series is equipped with front and rear low speed crash absorbing wrap around bumper system. Upon impact shear pins allow struts to absorb impact, bumper retracts , bumper disconnects at side wheel openings , collapses , recoils and falls to the ground. To be reused , again, reattached , designed as such. Damage sustained to park light wire connector and possibly park lens. Similar low speed impact on new audi results in 5000 dollars damage.
And finally the 5000/100/200 looks distinctive, proper, a clean design , no visual distraction by useless sheet metal creases to strengthen thin body panels. No flamboyant expensive to replace low output cosmetic front /rear lighting. Easily identified as a 5000 , where as the new Audi, sans its identity badge, looks like every other new car on the road. The 5000 was built to compete regardless of cost against its german rivals during the period (82~89) of the most robust german cars. Todays audi is built to compete against Asian rivals and at a cost.
Quote : "When will the world bow down to the Audi 5000CS Turbo Quattro and acknowledge that it is the most modem and sophisticated four-door sedan on the planet? Probably not as long as the prestige leaders- BMW, Jaguar, and Mercedes- Benz-keep building cars the old-fashioned way." Don Sherman
During assy: Entire 5000 body emersion in zinc/galvanizing bath, allowed to dry and re applied emersion , this extended and delayed production, painting then components installed. Worth your efforts to take care of your audi.
Found the most remarkable stuff B&W Tire Cleaner. Just spray it on the wheels and wash it off. To be fair, very light scrubbing might be required with extraordinary amounts of brake dust. When I first got my 100, I thought the line of brake dust was paint. No wheel cleaner would touch it. I sprayed this stuff on and it came right off. I know it is a "tire cleaner", but it works.
Word of advice: From what I read on other posts here and on audifans.com,
WD-40 tends to make the problem worse over time. Dirt collects and it kind
of gums up and gets sticky. Most recommended using a high-quality teflon
lubricant on the rails. So, I lubed the rails with the same stuff I use for
my bicycle chains (White Lightning chain lube). No problems for 8 months now.
--- Gary F
Better to use the Teflon spray Gary recommended or a dry graphite lubricant
/silicone spray which dries to the touch.
--- basecamper
If it is the trim strips against the outer door windows that seal moisture out, they just clip on. Lower the window and examine where the spaced clips are located using a flashlight. Then very carefully open the clip a bit with a long thin screw driver and work the trim upward to bring it loose. If you are replacing it, just grab it and pull it up. It is probably going to break up anyway.
sea foam.....i learned about this from my basic engine performance teacher. do this at own risk.if your car has more than 70,000 miles or more repeat yearly here after get engine up to normal operating temp.find a manifold vaccum port after throttle body.get a peice of hose attatch it to the manifold vaccum port suck in 1/2bottle of the sea foam or chemtool.shut off ignition allow to soak 15 minutes.restart suck the rest into intake at varying idle speeds.DO NOT LET THE CAR STALL after restart.run engine in park or nuetral until it stops smoking.alright bud thats straight from my notes and now i'm gonna tell you you better do this outside cause man your cars gonna smoke your gonna think what the h@&# he tell me to do to my car.but dude this works your car may somke for a few hours but when your done yuoll notice a big differance. also clean your metering plate and your throttle body with the same solevent but just put it in a bowl and use a tooth brush and a rag.you can get seafoam at advanced auto parts or a local place and the chemtool is at autozone both are about 5.00.
My suggestion is to start with the switch. Try to open up the switch and clean the contact with sand paper. The inner part of the switch holds onto the outer part--I will call it shell-- by 4 anchorages (hope you know what I am talking about here). Use a narrow blade screw driver or something similar to pry the anchors out one at a time. Do one side (two anchors) first. Then do the same for the other side. After all 4 anchors are clear, push the inner part out of the shell. Be careful here, I have seen two kinds of switch. One only has 4 anchors like above, the other kind has 6. The two extra anchors are on the button where you press to up and down your window. They are in the middle on both side of the button. What you can do is to widen the shell at that point and try to loose the anchor. Again, one side at a time. The button should come out after you loose both anchors. Then take the inner part of the switch out of the shell. Go ahead clean the contacts.
Advanced system of cables rather than a scissors mechanism. problem is , it works too well, that is to say too powerful as opposed to a motor gear system. audi employed the standard "auto down " electrical system as used in most cars. A current sensing system to detect excessive motor load when window is fully down and a relay to cut motor power. over time using the auto stop , or holding the down/up button for too long of a period will break the cable system. Tip: when using the drivers auto down , hit the stop button before the glass bottoms out , and bump the switch in increments to full down. Never hold down/up on the other windows beyond actual full glass motion or enable with glass frozen or out of alignment and the system will last a lifetime.
Failure to do so will give you the opportunity to view a future tip on how to bench repair and electrically enable the cable system.
The leads of the switch are labeled by numbers. Here is the whole set up of
the leads on the switch:
1, 2 power out from the switch to the motor. If 1 is positive then the
window comes down. If 2 is positive then the window comes up.
3, 4, 5 power into the switch. 4 is positive. 3 and 5 are negative.
Q U E S T I O N : Could you please tell me why I should buy premium over regular grade gasoline? Is it really worth the difference? ------ Junyong P.
A N S W E R : In most cars, there is absolutely no reason to use premium instead of regular. According to the American Automobile Association (AAA), premium gas accounts for about 20 percent of total gasoline sales in this country, despite the fact fewer than 10 percent of cars on the road were designed to burn the higher octane fuel. The result: U.S. drivers spend about $1.7 billion per year more for gasoline than they should.
The octane rating is a measure of how well gasoline resists that lawn-mower like rattle and sputter known as engine knock. If your engine is running at 100 percent efficiency, the compressed fuel and air mixture inside the combustion chamber burns evenly, fanning out from the spark plug until all the fuel in the chamber is consumed. But no engine runs quite that efficiently. Instead, a chemical reaction occurs in the unburned fuel mixture in the combustion chamber before the flame created by the spark plug arrives. That reaction can create hydrocarbon molecules that have a nasty habit of auto-igniting before the spark plug-initiated wave of flame arrives. When auto-ignition occurs, a rapid increase in air pressure inside the chamber results as both the auto-ignition gases and the spark plug-initiated flame expand. The increase in pressure yields a distinctive knocking sound and can cause severe engine damage.
The octane rating was developed in the 1920s when researchers discovered that certain hydrocarbon molecules resist breaking down into the particles that are susceptible to auto-ignition. Among them are molecules with eight carbon atoms - known as iso-octanes. The higher the octane rating, the more resistant the gasoline is to developing molecules that can cause knocking.
No Performance Boost
A small percentage of sports cars and luxury vehicles with high-performance, high-compression engines do need premium fuel to run their best. Fortunately, most cars on the road today that were built to consume higher octane gasoline come equipped with electronic knock sensors. Pump in regular and the knock sensors tell the engine management system to run a little less efficiently, protecting it from the ill effects of knocking, but with a consequent minor loss of power.
If your vehicle is among the 90 percent of cars designed to use regular gasoline, here's what will happen if you spend the extra 20 cents a gallon or so for premium: not much. According the Federal Trade Commission, using a higher octane gasoline than that recommended by your owner's manual "won't make your car perform better, go faster, get better mileage or run cleaner."
The FTC has put its money where its mouth is, suing a number of major oil companies over the years for making misleading and unsubstantiated claims about the benefits of high octane fuel. The agency estimates that the majority of consumers who buy premium gasoline are spending an average of an extra $100 a year for no real benefit. Think of it this way: if you've been pumping premium gas into your family sedan for the last 10 years, that $1,000 that you wasted would have made a nice start on the down payment for a sleek little sports car that will really fly when you fill 'er up with high-octane juice.
Q U E S T I O N: Motor oil: SAE 30, 10W-40, 20W-50. What do all those number and letters mean? ------- Danny S.
A N S W E R: Many thanks for your query. I may be an Answer Geek, but I'm no gear head, and it's always nice to increase my limited store of knowledge about cars and engines. At the very least, Danny, answering your question will save you, me and others like us from that withering stare we get at the gas station or auto parts store when we ask for a quart of oil and then have to own up to the fact that we have no idea what grade of oil our car requires. For men, that is one of those dreadful moments designed to amplify whatever feelings of masculine inadequacy you may already be struggling with.
Here's what I found out:
The thing to keep in mind about motor oil is that its main job is to protect your engine from wear caused by the friction created when moving parts rub against each other at high speeds and high temperatures. The quality that allows motor oil to lubricate those moving parts is viscosity, which describes the ability of a liquid to flow. In a laboratory, viscosity is usually assessed by measuring the flow of a liquid through a tube with an opening of a fixed size at a standard temperature, or by measuring the resistance that liquid exerts on a rotating shaft in a container. The standard unit of measure for viscosity is either the centistoke or the centipoise. Bigger numbers mean greater resistance to flow and higher viscosity. Water, for example, has a very low viscosity and it flows quite easily. Molasses, which is thick and goopy, has a very high viscosity. Needless to say, neither one is a good bet as a substitute for motor oil.
Before we get to meaning of the numbers on a quart of oil, you need to understand one more thing: Newtonian fluid dynamics. As you may or may not know, many liquids obey Newton's Viscosity Law, which in simple terms states that viscosity varies directly in relation to external forces. Typically for Newtonian fluids, lower temperature or higher pressure raises viscosity in a straightforward way as friction increases between molecules. In these liquids, more friction means greater viscosity, plain and simple.
But not all liquids behave in accordance with the dictates of Newtonian Viscosity. There is a class of fluids for which viscosity does not change in a linear fashion in reaction to pressure or heat. These rebels of the liquid world are known as non-Newtonian fluids. In such liquids, for example, viscosity may decrease as temperature rises until a critical point is reached and then the liquid may suddenly become more viscous.
What does this have to do with the numbers on a quart of oil, you ask? One of the tricks for making good motor oil is that its viscosity must be low enough so that it will flow when cool, but not so low that it fails to lubricate at high temperatures. Most pure petroleum lubricants are Newtonian fluids, and at either the top or bottom of the temperature range, they just don't work well any more. In recent years, engineers have discovered that adding certain carbon polymers to petroleum lubricants will turn them into non-Newtonian fluids that are much better at protecting a car engine under a wide range of conditions. Those polymers are called viscosity modifiers, and motor oil makers have learned to add the just the right combination of viscosity modifiers to create lubricants that flow easily at very low temperatures while maintaining enough viscosity to lubricate the moving parts in an engine at very high temperatures.
Viscous Cycle
So, those numbers on a quart of oil? They refer to oil viscosity, based on a scale established by the Society of Automotive Engineers (which is where the "SAE" comes from). The scale rates oil from a low of 5 to a high of 50. As you've probably noticed, most automobile motor oils have two numbers. These are multi-grade oils, which means they are non-Newtonian fluids.
The first number describes viscosity at low temperatures. The second number refers to viscosity at normal engine operating temperatures. Some examples: the "5" in a 5W-30 motor oil will protect an engine down to an air temperature of about -25 degrees Fahrenheit. The "10" in a 10W-30 is good if the lowest temperature where you live is likely to be in the neighborhood of -10 or so. As for the "30," that is well-suited for the typical temperatures that most cars operate at these days. If you are driving a racing car, or pulling a heavy trailer on a hot summer day, you might want the higher-temperature protection afforded by a motor oil with a second number of, say, 50. (As for the "W," it indicates that the oil is designed to work well in cold weather.)
In the old days, motor oils came in only the single grade variety. Back then, if you lived in a cold climate, you'd would have to use a different oil grades in different seasons, switching from an SAE 30 in the summer to an SAE 10W in the winter.
Which oil should you use? Don't ask me. Like I said, I'm no gear head. My suggestion: Refer to the owner's manual that came with your car. It will tell which grade to select. Personally, I wouldn't get too creative about my choice of motor oil unless you know a lot more about cars than this Answer Geek does.
And my answer the next time someone asks me what kind of oil I need for my vehicle? First I'm going to ask them if their selection of motor oils includes any non-Newtonian fluids. Then I'm going to inquire about centistoke values. After that, I'll give them a withering stare to make up for all the times that I felt like an idiot when I thought "W" stood for "weight" and I didn't have clue what grade of oil my car required. Finally, I'll ask for 10W-30 oil because that's what my owner's manual recommends. That is, if I don't get nervous and forget.
Q U E S T I O N: When I'm filling up my car at the gas station, how does the pump sense that the tank is full and then automatically shut itself off? ----- Kate S.
A N S W E R: After spending the last few weeks tackling such weighty topics as the human genome project, space travel, and, of course, why eating crunchy food appears to make your monitor flicker, this question comes as something of a relief. Back in the old days, explaining how mechanical gadgets worked was your average Answer Geek's stock in trade - it was all hydraulics or capillary action, how one kind of mechanical energy was converted to another or the way the gears meshed. Now, of course, it's a whole different story. These days it's all about microprocessors and scanner and barcodes, the storage and transmission of 1s and 0s or the flow of ionized particles. Don't get me wrong, the technology is fantastic, but when a group of Answer Geeks gets together for a beer after a long day of answering questions, you'll often hear us lamenting the old days when we had the satisfaction that came with feeling like we had rolled up our sleeves and gotten our hands dirty.
An Old Technology
The automatic shutoff on a gas pump is definitely not one of the miracles of modern technology. But it is a very cool little me chanical device. When gasoline flows through the nozzle, it passes through something called a venturi, which is a tube with a narrow throat that changes the speed and pressure of the liquid passing through, creating a vacuum. The nozzle also contains a very small tube that begins just above the open end of the spout.
The next time you fill up your car, take a look at the nozzle and you'll see a small hole. That tube runs back up into the fuel pump handle and as gas flows through the nozzle, the vacuum pressure created by the venturi causes air to be sucked up through the tube. As long as the tank is not completely full, air flows unimpeded up into the handle, and nothing much happens except that fuel continues to pour into your car.
As your gas tank fills, the fuel level rises until it covers the hole at the end of the nozzle. Suddenly, the flow of air stops and the vacuum pressure begins to build - think of what happens when you suck on a straw without putting it in water; if you place your finger over the open end, the flow of air stops and the pressure inside decreases until the straw collapses. In the nozzle handle, the vacuum pressure builds until it forces a small diaphragm inside the handle to move. That movement triggers a lever that pops the handle trigger, shutting off the flow of gasoline.
Pretty clever, eh? And it's all done without transistors or sensors. No light-emitting diodes. No charge-coupled devices. Just levers and vacuum pressure. And a venturi. I tell you, my fellow Geeks are going to by psyched when they hear that I got to mention a venturi in this week's column.
That is the switch controls the cold start valve. I was trying to follow the wires from the cold start valve. But it is not that obvious where the wires go.
How would I go check it?
>>>>>>>>>>>>>>>>>>>>>>>>>>>>>>>>>>>>>>>>>>>>>>>
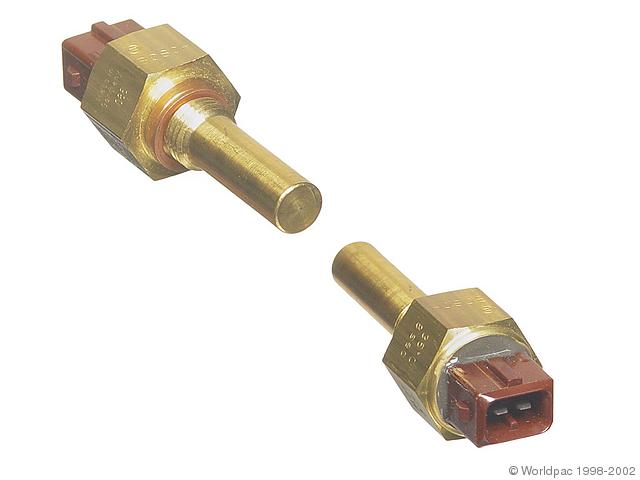
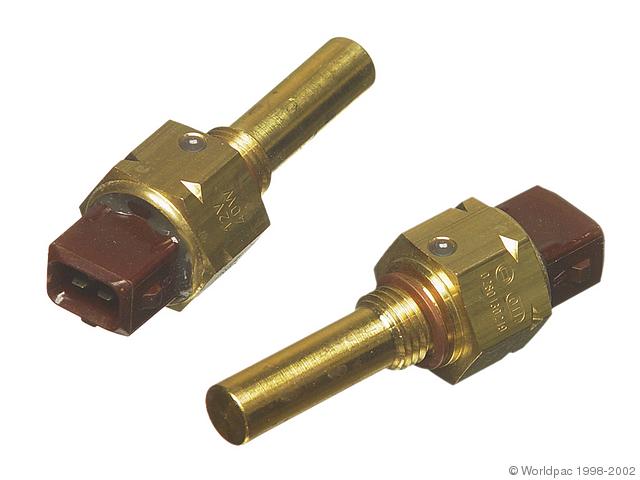
Screwed into the back of the cylinder head. Part # depends on your most normally encountered ambient temperature. There are 2 options.
With the engine cold you can pull the cold start valve out and crank the engine.(only 1 time) See if the cold start injector fires. Extreme fire hazard!!! If the cold start valve sprays, the thermo switch works.
If you are experiencing hard starting and long cranking times when the engine is cold, its usually leaking injectors, not the cold start valve/thermo time switch.
see SJM site.
Tom Chudzinski
It's caused by the speed sensor being too far from the driveshaft. Here is all you want to know about speed sensors.
If a sensor is bad, the light will stay off when the car is started, and then come on after driving the car from 10 feet to 2 miles. If the problem is elsewhere, it may turn the light on before moving the car.
To find the bad sensor, listen carefully after starting your car for unusual noises from one wheel. That's the one with the bad sensor. The noise is the ABS kicking in and out, until it decides to shut down. You can hook up a DMM to the sensor outputs, raise the car and spin the wheel. You get a square wave (A/C) from the sensor. The actual value is irrelevant, matching them is. Basically, you want to get the same reading from all sensors spinning the wheel approximately the same speed by hand. Try removing the sensor, cleaning it, and reinstalling it until it rubs the hub. DON'T drive it like this you may damage it!! You must back it out slightly. It should not rub, but be very close. They should "bottom out" while installing, without hitting the sensors on the driveshaft. The sensors too far from the driveshaft will give you pedal "boing" -- this is a groaning/spring sound just as you come up to a stop. The sensors too close will give instant ABS pedal kick in. Too far out tends to shut off ABS quicker than too close.
If you can't get the light to go out at all, you might have a fault in the center differential lock switch, or one of the sensors is just bad. Worn or crudded driveshaft splines can do it too. There is an inspection/water drain at the bottom of each strut, you can sometimes get a brass bottle brush in there, though pulling the driveshaft out is easier, and about a 20 minute job. First check for proper sensor output, then check the differential switch, then the driveshafts. Rarely does that ABS box go bad. Sensors out of alignment usually allow the light to come on till the first brake app or 20-30 seconds, whichever comes first.
FOUND! An inexpensive source for _THE REAL THING_. Genuine PENTOSIN fluid, reg. $16.50, @ $7.99. PAP, Porsche Audi Parts, 1-800-944-2964. These guys have all kinds of Porsche/Audi/VW stuff at GREAT prices. Very knowledgable too!
If it idles high its "metered" air. I would clean the ISV. Check the engine grounds. Check the throttle switch.
I wrote this awhile ago:
Thought I'd post the results/conclusion for those who may have idle problems in the future:
The car had a rock solid 800 rpm idle. Suddenly while driving idle would not decrease below 1200 rpm. Would climb to 1400 rpm then drop again to 1200. Frequency was about one cycle per second.
Airflow passes thru the MAF (metered air) and enters the intake manifold at the point where the "Michelin Man" hose connects to the intercooler. If you remove the MM hose you will see the throttle plate and a cast air channel which allows air to bypass the closed (at idle) throttle plate and enter the other end of the intake manifold via the ISV. This is why the MM hose has the tear drop shape.
With the throttle plate closed (foot off the gas) the throttle switch directs the ISV controller (marked as Idle Volume Control on my fuse panel, gotta love the translation) to regulate air flow into the intake manifold using the ISV. The ISV contains an air regulator disk controlled by a solenoid. With current applied to the solenoid the disk will move toward the electrical connector providing a path for air to enter the intake manifold. With no power applied a return spring returns the disk to the shut position.
It was suggested that a vacuum leak could cause the problem. It was not clear to me how a leak could cause the engine rpm to increase. It seemed that the increase in rpm was likely due to an increase in metered air and the engine computer was responding accordingly. I felt a vacuum leak would cause unmetered air to enter the intake manifold resulting in an idle stumble.
As suggested I cleaned the ISV and then tested it with a 12 volt/half amp power supply. The disk moved freely and snapped shut when power was removed. One notable difference was that the replacement ISV would not pass air when I blew into the inlet side of the ISV. The problem ISV would allow air to pass.
I believe the return spring in the failed ISV was fatigued from years of fighting the solenoid and no longer has the spring force to seal against engine vacuum thus resulting in the increase in "metered" air during idle. I'll see if I can break it open an repair it with a stiffer spring. I'll let you know.
JAS
'86 4000cs (RIP)
'86 5000CS QT
Mine had loud static when it was turned. Had no luck ad disassembling radio and the switch was probably not servicable. Figured I would replace the part but tried to spray DOxit (Caig Labs) in the side of the knob. Static stopped and has been fine for months since. Tuner cleaned should work about the same. I would just have the radio off when spraying. Can't hurt, Might help.
Tony
'91 100Q 5spd
hmm I should be working, but here is how you do it ...sorry for any spelling mistakes, grammer ... but u will get the idea.....................
tools needed
-soldering iron / solider
-exacto knife and small scissors
- needle nose and reg pliers
- phillips screw driver and a slot
- meter for continuity test.
- electrical tape
General info
the seat has to be moved first to the rear most position to get at the front bolts. Don't forget to at this time to unplug the heated seat plug..shoud be attached to the base of the seat.( this is where you do your testing from ) and also the seat motors plug. The seats are bolted to the floor on the front by two bolts .. the rear legs are on rails.
Now after the bolts are out move the seats forward by hand to expose the two rear rail stoppers. The rear stopper that runs along the middle of the drive tunnel is long .(unscrew using a Phillips s driver ) Slid seat out of rail ...be careful not to lose the white or black rail inserts that are attached to the seat feet, sometimes they fall off .... they stop rattling and help movement along the rail.
Once test are complete ( test can be done in the car, but repair is best done outside of car )
Heater 1 seat, bum
Heater 2 back
Testing plug Heater 1 Seat and Heater 2 back
Plug is found under seat
looks like this
---(1) ** ---(2) --- (3)
---(4) ** ---(5) --- (6)
** space in plug between connectors
-to check the Heater Seat 1 (bum) check continuity between 2& 6 ( yellow strip (black) & Blue strip (brown ) )
-to check the Back heater 2 check continuity between 1&4 brown/blue & brown.
- 5&3 is for the temp button in the seat ( temp sensor )
Heater 1 seat ass but bum ( HOW TO TAKE SEAT APART )
- take cover off of seat controls , up , down, sideways etc
- pop hinge covers of L & R
- unscrew hinge screws L&R ( you need to do this so that you can get the fabric up off the seat )
- now go to the back of the seat ... you will notice a skid plate fabric at the bottom of the seat ( black ) this sort of connects to the fabric of your seat ( leather, gray fabric etc ) Both of these fabric are shoved into a small channel to hold the upper and lower .... pull this apart.
- now at the L & R near the hinges .. there is a wire that runs along the base seat inside the fabric of the seat .... loosen off both sides .... looks like common bailing wire.
- start from one side of the seat and work your way around the base. What you are looking for is clips and plugs than hold the skirt of the seat down. Be careful as there are a couple metal clips that you could miss. undo all these.
- now pull the fabric up over the hinges , front and sides.
-NOTE fabric is attached to small straight wire rods. These coat hanger size rods or wires go horizontally in both Longitude and latitude directions.
this is what it looks like
note there are two rods that hold the seat fabric to the cushion.
top of seat
----------------fabric-------------------------------
fabric is attached to rod below
L .....................rod.............................................. Right
L........................rod.............................................right
the Rod above is kind of attached to the cushion
the two rods are held together with small circular clips
This system of little rods goes along the pleat lines of the seat.
-Okay now start and peel the front of the seat back and you will come to your first Rod this will be held by about four circular clips. Take the pliers or needle nose and you have to twist them off.
-Once you have finished the first lateral rod you will have to work on the longitudinal rods.
-now that you have the fabric off the seat you will see the white pad that the little wires go though..... before you start cutting away at things look for a small brown stain ( burn marks )
that is where the brake is usually, not always.
-attach your meter at rear of the seat you will see two wire attach your meter to one of the wires ... that is the circuit of the heating element. Work your way up this wire until you have no beep
... ( using the little metal probe to genitally break the surface of the wire ) look for the break in this area ,, most of the time it is a fold where one of the rods has been.
-Fix with a small amount of soldier . Too much solder is bad = it creates a higher resistance and thus More HEAT to that area. Trust me my wife's ass can attest to that!!!
Now the fun part take all those nice little wire clips and straighten them out and make them round with a gap so you can get them over the rods ... the first couple are a real bitch but you will get the hang of it. Work from the back to the front.
This job can be about a three to five hour job ( for your first seat )
just do the revers to put the seat back together.
To do the BACK same sort of procedure as seat.....
any questions please get back to me at David.morralee@aaaaaaaaaaAlcatel.com take the a's out
regards
David
I have done this work three times before this writeup. Each time I discovered some kind of tricks to make the job easier. By the time to do the next one, the tricks learned before have long been forgotten. So here is the cure of that.
First, the tools. A pipe wrench as the substitution of the official tools. It should be big enough to hold the big cap that holding the strut insert, yet small enough to fit through the shock spring. The one I used is with maximum openning of 3 inches if memory serves me right. A 22mm off angle box wrench is a great help for loosen and fasten the top nut. A vise grip or a 7mm allen key depends on the insert you have. 13mm socket or wrench whichever avialable to you. A lot of strength or an extension pipe that fits the pipe wrench. These are all that needed.
Now the precedure. Note that it is not a good idea to switch the orders. I bet you would regret it if you do.
Has a mind of its own. you can possibly be locked out and drivers key WILL NOT over come vac pressure without breaking door latch. often happens when battery is reconnected and door closed.
The fix:
remove the rear license plate behind is a small dimple in the panel (lower corner). There for a reason for this dimple .......german right? if you drill a small hole (around 5mm) at that dimple and insert a rod it will trip the rear latch and open the trunk. Now you have access to the air line (up in the lid left side) running to the rear latch. remove the air line and thus release the pressure and drivers door will open with key. return license plate thus covering the hole. you can also apply air pressure and activate the locks from this line. before you drill make sure you understand the mechanical principal of the rear latch, what to trip in what motion with the rod. and insure latch is lined up with preposed drill hole.
Oil cooler hoses are braided stainless, made to last . problem is the stainless braid connects to steel pipe. over time the connection can fail. to avoid this from happening , apply a layer of JB WELD at the stainless to pipe fitting joint. make a wrapped joint of JB weld extending approx 1 inch in both directions from the joint. clean the area throughly of oil and dirt with brake cleaner prior to JB. There are 4 joints, 2 per line.
while you are under there apply product "1 step" liquid (not aerosol) rust prevention to the steel pipe sections.
In the event you decide to replace these lines , if unsuccessful in loosening the line fittings (28mm flare / line wrench 6 point) at the oil distribution unit on the engine. you can remove the entire oil distribution unit ( that is the unit with the oil filter on it) from the engine block with the large center nut. First disconnect the oil cooler from the car body at two mounting bolts. Next remove the turbo (2 ten mm bolts holding the oil line to turbo on the oil distribution unit. CAREFUL! hold the oil dist unit body secure from turning as you loosen large nut because oil dist unit is pinned to the block with two pins and must not be allowed to turn during removal. Once the center bolt is out pull dist body straight away from the engine block pins. Now preform bench removal of lines.
All of this unnecessary if you JB weld the lines, and apply rust prevention, will last your natural life time or until you finally crash your Audi and die early.
Pentazine, even at a discount it is valuable. Why use it? Because of CORRECT VISCOSITY. Audi steering pump operates at near 2000lbs . The wrong viscosity fluid could easily over/under pressure the system. No telling what effect on brake bomb/ hydraulic servo the wrong fluid could do. Use the correct pentazine fluid specified, Now how to not waste it.
Originating under the reservoir are two return supply hoses. One lower than the other. Purchase a small brass "in line handle" ball valve to fit the hose inner diameter that goes to the steering rack. Hose clamp it on, no pressure there. Now when working on the steering/brake/pump system simply turn off the flow from the reservoir, this will prevent unwanted loss of fluid during repairs. The reason for a in line handle is to be able to quickly see the position of the valve. In the event a small leak is detected, turn off the engine , turn off the supply until repair is made thus saving all your "green gold".
In the event of having lost your car key , or desire not to carry a key or wishing to open and start and your key is at a distant location , it is a wise idea to hide a key somewhere on every car.
The audi 5000 has just such a place. Hold back the spring return side mirror (driver or passenger) and there is a convenient cavity between the rubber surround and the mirror back. suggest this spare key be on a short cord to allow you to retrieve the key from the cavity. It will not conflict with mirror motor adjustment.
On the outside of 5000 doors are horizontal black plastic guards.These guards are just not for parking lot protection but actually provide side crash impact protection. Under the plastic are magnesium bars. Magnesium is light for its strength and is a good , albeit, expensive choice. Problem is magnesium will decay over time if exposed to road elements, leaving a green powder coming out from the bars.
The Fix . Before this decay takes place , with the inner door panels off , remove the bolts holding the bars and spray seal the inner bar surface with clear acrylic or similar water/air barrier material. Run a bead of clear silicone around the inner plastic along bar joint and reattach to the body while silicone is wet.
Hood rods. Don't have any? How about coat hangers?
In the event hood opening mechanism fails from inside Audi it will be necessary to trip the exterior hood latch levers. the audi has two hood latches and both must be tripped simultaneously to release the hood. secure two rods of correct length and diameter and insert into the eyelets visible thru the grill. Pull both rods together at the same time.
Tip: keep these rods in the trunk, you will need them away from home, practice opening the hood, it is not easy, and lubricate the wire and guide assy and inspect it to prevent failure, both latches must operate or else hood will not open.
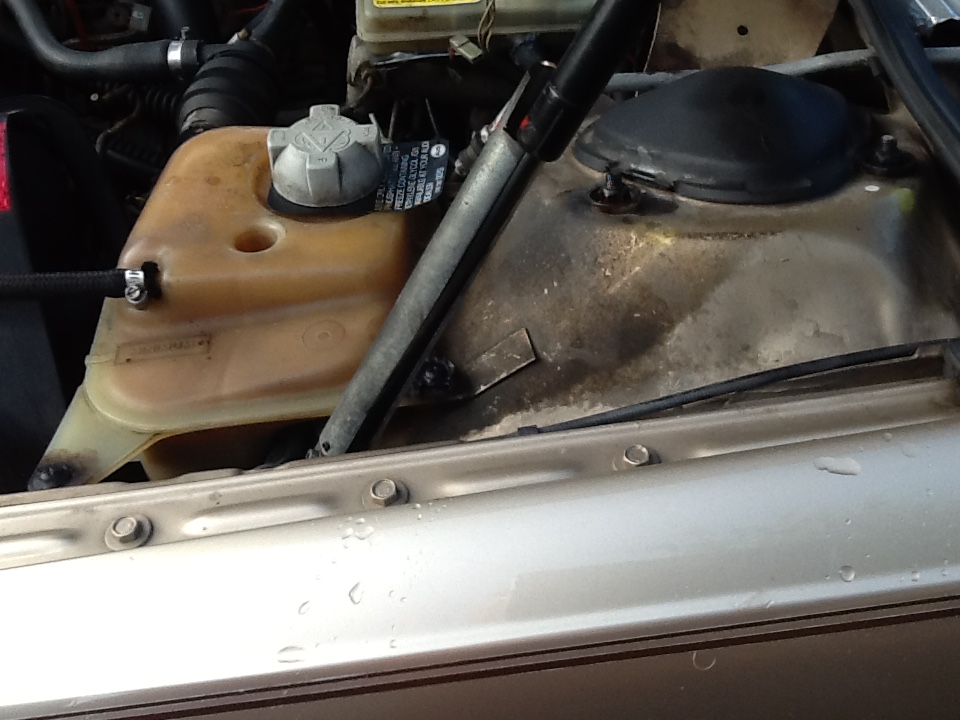
Outdoors on a windy day could result in a open engine hood slamming shut, even with good strong gas struts. Simple solution is a strut locker. Lockers can be ordered from guden gas springs, special order due to size,
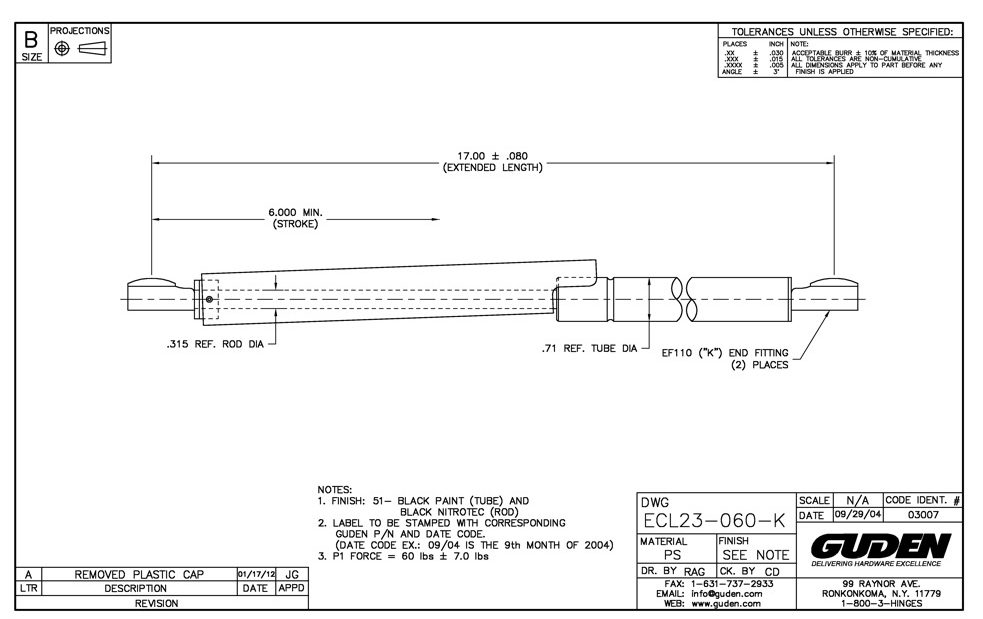
But actually it can easily be fabricated from light tubing, with a notch cut in the upper end and a clamping collar on the bottom. small leaf spring or rubber material placed inside springs the tube into lock position when strut is fully erect. pushing inward releases then lock notch and strut compress as normal.
Simple to make , thus one uses a half circle clamp around strut base, and 1/8 in wide flat spring held at base clamp.
Caution: remember to unlock it before attempting to close hood. No need to bring this to the attention of your Audi mechanic.....you are THE Audi mechanic.
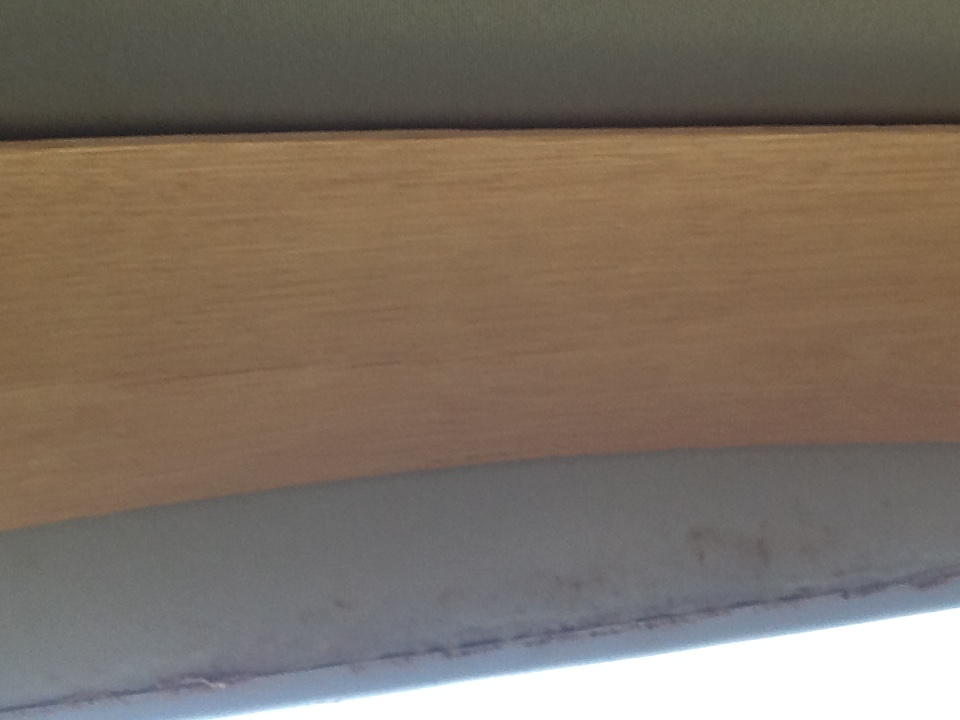
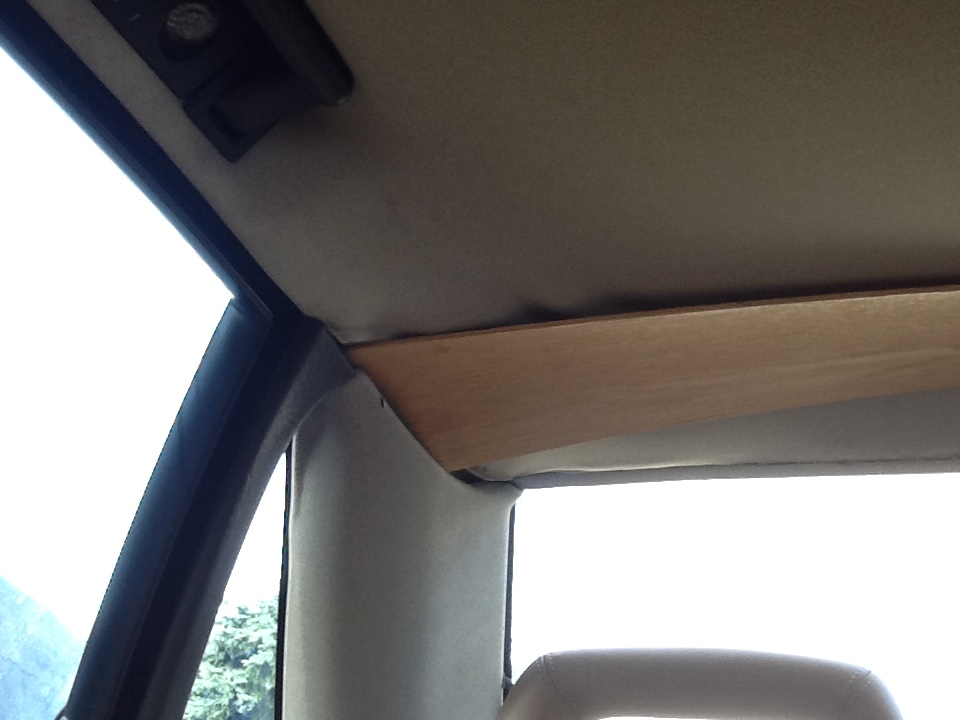
The foam material audi used between the roof and the inner cloth headliner is known to deteriorate over time. A full blown headliner repair , cutting and scraping and re-upholstering is a big job and you may not need a complete overhaul. Usually only at the rear glass first. Near impossible to glue or secure the cloth against flaking green powder roof inner liner. Some car headliners can be steamed then rolled back to position to reactivate the glue but the 5000 has about 3 in of green foam, that turns to powder over time.
The fix is going to take advantage of the edge plastic surround piece as a holding source.
Two material options: color match thin plastic strips or thin veneer wood. Visit a cabinet or wood molding shop and purchase thin flexible strips of matching decorative wood. usually 3 in width or less is fine and thin enough to allow easy bending without breaking. carefully place and pre bend and cut to length so as to fit the ends UNDER the side plastic edge surround . The right length will cause the wood (or plastic) to bend and stay in a bowed tension position pressing upward. you can be creative and use as many strips and widths as you see fit. Many older cars from the 30 to 40 era had wood rib head liners with cloth material between the ribs, this is what you are simulating.
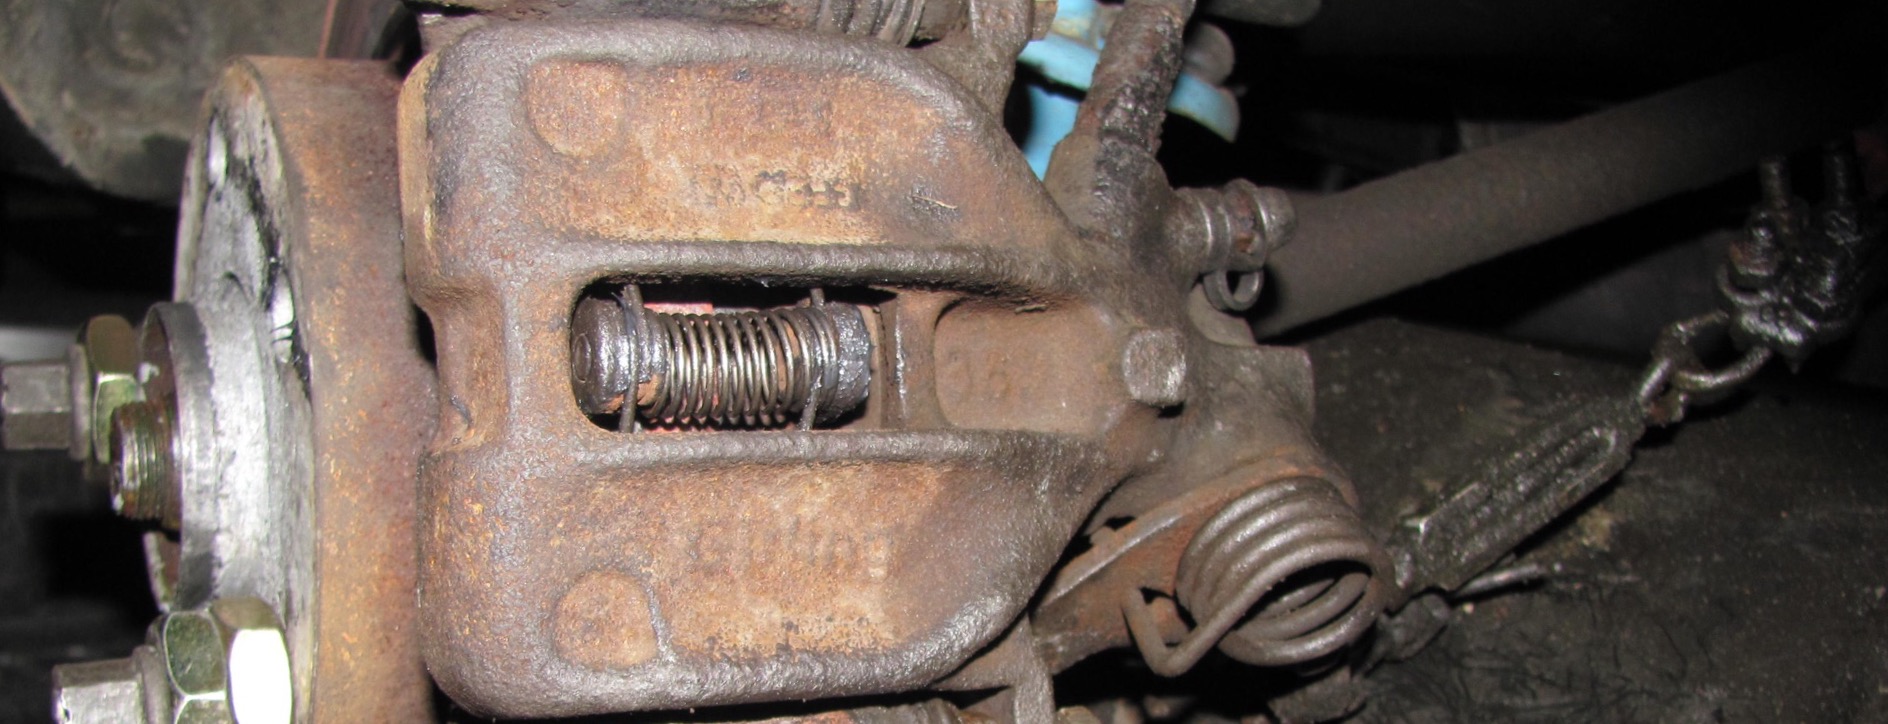
Two problems. Parking brake and pads not retracting after brake application. The parking brake cable on the quattro routes itself from the center hand brake to each rear caliper. Very difficult to get each caliper the same tension and pull distance. Install a turnbuckle on each cable then you can individually adjust each caliper and relief the tension to connect cable eyelet. By design the pads have a raised area near the edge. By chance this is exactly a perfect place to secure a coil spring. the spring then provides extra force to retract the pads from the rotor disc.
Stalling un-even/intermittent idle. As you are aware any un metered air into the intake will cause un even idle and stalling. After you have gone over all the hoses, injector O rings and insured the cold start injector is not leaking and idle stabilization device is ok.....and you still have the problem.....frustrating.....especially when your quattro idles fine stationary but problem occurs during a drive. This symptom is unique to the manual transmission Audi.
The Fix: carefully inspect the area above the clutch pedal lever arm. Way up in there deep and you will see a hard green vac hose. this hose comes into repeated contact with the clutch pedal upper lever section. Over time it wears into a ever growing vac leak with each clutch pedal application. Sometimes you have no problem at all until you make your first shift, then momentary vac air enters the manifold then closes as you release the clutch and hose comes back together. "Drives" you nuts. Get on your back and look up under the parcel shelf clutch pedal lever area. Inspect the hose, cut and slice a brass ferrel into any cut, push and secure that hose up and out of harms way. Then go to your chiropractor and get your back realigned.
Not all quattros are assembled exactly the same way and you may or may not have this hose exposed near the lever....keep it in mind.
Forth coming several electrical tips, some involve manual override switch(s) , the location of switch(s) suggestion tip. Personally Not in favor of drilling holes, or removing plastic knock outs. I Favor leaving everything OEM, besides it is difficult to run wiring behind the dash, difficult to get at the wiring in the event of repair, also requires labeling of such switch and extra wire to provide illumination for night time location. A simpler better solution is afforded on the 5000 series. Under the steering wheel is a parcel shelf. This shelf is accessible while driving. Simply lay the switch on the parcel shelf, insulate the wires at a switch back , route the wiring easily behind the shelf and leave the switch lay on the shelf. It is out of the way . Driver simply reaches down, activates the switch. Using different body style switches you understand by feel which switch ( of several) you have your hand on.
With a locking gas cap and trunk on the 5000 it is important that all yours locks and ignition operate on one key, the ignition key. all the locks sets on the 5000 can be removed, cylinder, and coded to open on one key of your choice. There are like 5 brass slides, removable and cut if desired, and can be set in position to slide forward into your one key cuts and allow lock cylinder to turn. the principal is based on spring loaded brass sliding pins. The pins slide forward into the key cuts far enough to allow cylinder to rotate. You can mix and match pin lengths or shorten them. the cylinder slides in from each lock back.
Special wheel valve stem. There was a light weight wheel offered by audi on the 5000CS Quattro.
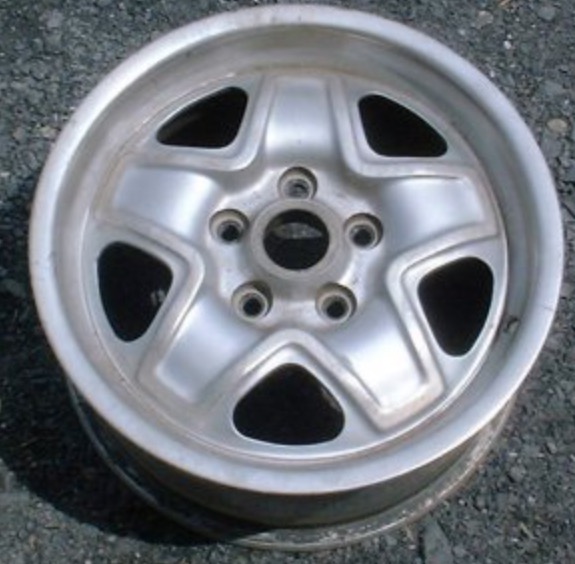
My favorite of all the oem wheels, but there is one unique feature on this wheel that requires attention. Due to the placement of the valve stem and the depth of the rim never use a long valve stem. Centrifugal force at high speed, will cause the valve stem to flex toward the outside of the rim. Repeated flexing will result in a failed valve stem. Use a short valve stem or a all metal threaded valve stem. If there was ever a car you wanted to be driving during a complete and sudden loss of air in one tire .....it is the quattro. The original quattro system will mechanically retard and match the rotation of the other inflated wheels to the one damaged tire and smoothy under control come to a stop. You may not even need to brake, the quattro system will slow the entire car down.
This tip is for those , proficient in electrical field.
All things working as it should it will inject gas into the intake manifold, given a preset low temp. Mounted on then intake passenger side, near the top. Follow the braided fuel line from the fuel distributor, 5 go to each injector, one line by itself to the cold start injector. This injector is electrically activated. This assists in cold start warmup control providing a rich mixture to the engine. The injector has 12v present on one wire upon turning on the ignition key, its other input wire , the control wire comes from the ecu . The ecu provides ground to activate the injector. This ground control set up, common for ecu control, provides a opportunity to activate the injector manually and not change or alter its normal ecu control. Utilizing a momentary push button switch , providing ground , and parallel wired to the ground wire going into the injector from the ecu. A momentary switch must be used since activation will only be for a "squirt" of fuel . The momentary push button switch located on the parcel shelf below steering wheel , as I previous tipped.
So why do this? It is possible for normal cold start system not to function. It relies on ecu and temp sensor. You never know its operation till you actually need it. The injector rarely gets exercised and can stick closed. In very cold climate, you can manually activate the injector....allow a few seconds for fuel to vaporize in the intake manifold...and then crank the starter. 5000 will fire up immediately given this procedure. As a diagnostic tool, you will be able to manually inject fuel at idle to see if idle improves indicating a lean or low fuel pressure situation. It can give you a immediate answer as to if your fuel pump has failed, since the injector relies on fuel pressure to operate.
Several different years of 5000 have a different color wires off the injector, review your wiring schematic and with multi meter confirm the 12v line to the injector. Document all wiring connections and provide a schematic change to your audi.
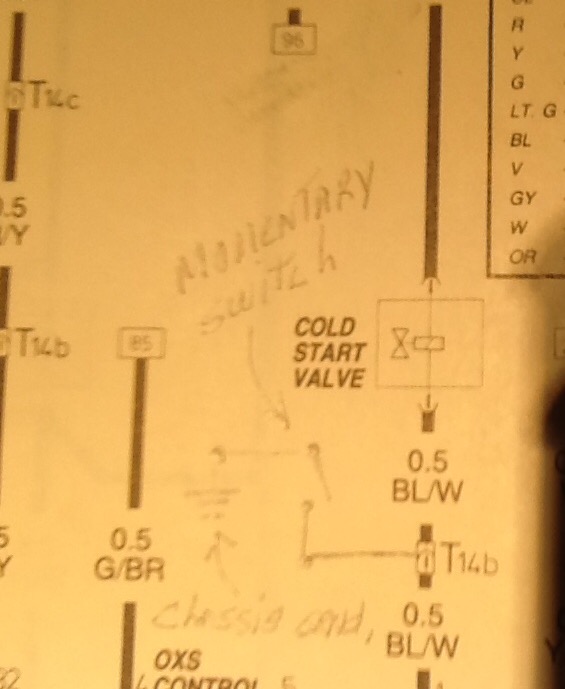
After finishing the switch, start the car and let it come to smooth idle, activate the switch for a brief moment, the idle should drop due to the induced rich mixture and back to normal . At this point you know your switch is working as well as the cold start injector.
Very good material, well designed , weak point is the stitching. Use large amount of leather conditioner into the stitching. better yet , buy a heavy CURVED needle and matching color cord , needle nose pliers and go over the stitching right thru the holes present before a seam separates, thus doubling the stitch , and easily done before a opening appears.
Fail to pay attention and you are left with no spare tire. difficult to check with a gauge you probably don't have in hand and you let valuable air out checking it.
tip : fill it up , a little over pressure , tighten down the holding bolt. now when you check it if the HOLDING BOLT or TIRE is loose , at all , that indicates the spare tire pressure has dropped. spend a little time on the internet , get a used full size wheel and tire, carry it on a long trip, you loose a little trunk space but well worth the trouble.
Forget about settings for various drivers, useless feature. But the memory drivers seat feature comes in handy. To actually be seated correctly ( in any car) while driving you will need to move the seat back fully to exit/enter past the steering wheel and clear your head of the A pillar. So , 1st memory position set to driving position, 2nd memory position set to full seat retracted.
The 5000 headlight switch located in the steering column cluster is notorious for failing. The contacts are undersize for the amperage flow, and the whole turn signal/ head light unit needs replaced to address the situation. Pressed plastic components in the cluster prevent any real repair.
Tip: Loss of head lights could sideline your drive. Mount serious driving lights under the bumper. Keep the brackets loose enough to allow the lights to be directed low and wide for fog use, but easily adjusted upwards and forwards for emergency headlights lights. Keep the holding bracket tight enough for security but loose enough to allow lamps to tuck under in the event of obstacle/bumper contact. Wire the lamps directly off the battery, with a dedicated fuse and heavy amperage illuminated switch located on the parcel shelf. As such no need to upgrade to more powerful headlight lamps or euro lights, but turn on the driving lamps when additional lighting is needed.
Audi advertises Intelligent Alternative. The intelligence is required to open the 5000 doors without breaking the handle the Alternative revealed at end of topic.
Never attempt to open a 5000 door if the door lock stem is down, your intelligent right?never attempt to pull a door lock stem up against vac pressure. Never attempt to force a frozen handle. If you do a click sound will indicate that the door OPEN rod or LOCK rod connection inside the door has come off. Actually better this than the door handle rotation stud breaking. That will require a new handle (key lock swap) or repair the stud with a new part. There are milled steel door handles from Europe suppliers to replace the original powdered metal handle but that does not change the plastic rod connections inside.
First go to another door and open the failed door from the inside, if you can not pull up on the lock stem against vac resistance, open the trunk and disconnect the green vac line up in the trunk lid. you can actually apply air there positive or negative pressure. You can also remove rear seat and go right to the air pump air line.
getting the door OPEN and LOCK rod back together: remove the chrome strip on the door handle outer surface, carefully pry it away from the end attachment. now exposed is a door handle screw, remove. with the door open find the rubber plug on the door frame ear the handle, remove the plug and see the two phillips head screws. At this point you need a special tool. a philips screw driver screw retainer. It has two spring loaded arms to capture and hold a screw when you slide the screw driver handle. a magnetic screw driver may not do the job for there are may metal parts adjacent to the screw. Loosen one screw just enough to capture the head with the screw retainer. Remove each screw with the retainer firmly holding the heads. Dropping a screw down in the door will require removing the inner panel, even a magnet will not always retrieve it, so make sure you got secure hold. Both screws out the handle will loosen up and allow you enough room to see which rod has come loose and which rod (2) connects to which door socket. One handle socket if for lock, one for open latch. at this point you need curved needle nose pliers maybe forceps and a stiff drink to continue. Before you attempt to snap the rod to the door socket take some shrink tubing and slide a tube over the rod plastic socket to strengthen the fit and cause the socket to hold tighter. even small wire tie below the socket helps in closing the rod socket more securely. actually you want the socket to pull apart in the event of a bind but not so loose to come apart in normal use. position the handle , don't forget the rubber trim and bolt it back in place. test it out and make sure the door latch is lubricated and releasing correctly.
The Alternative is the best auto door handle made by man. Ford, 1950' 6 or so. Handle is nothing more than a handle bolted to the door, latch release is thumb push button , nothing more. key lock is mounted below, nothing more. three separate individual components .
For those electrically proficient!
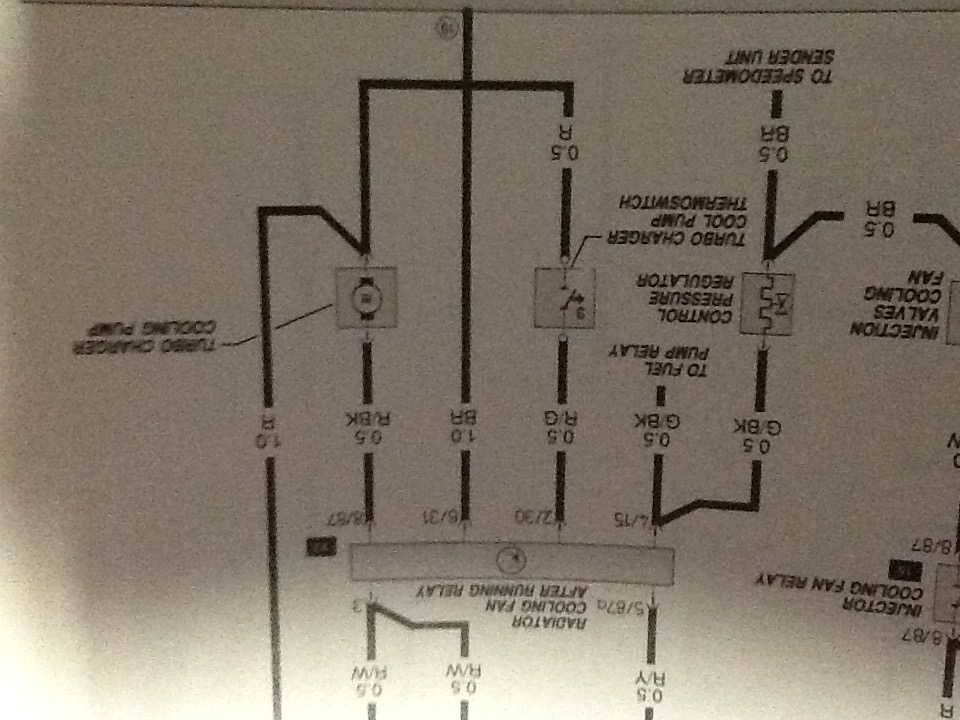
Operating correctly the 5000 temp sensor ( see schematic ) will initiate a series of 3. cool down events. 1. fuel injector cooling fan, 2. reverse flow water coolant to turbo and 3.run radiator fan low speed . This 3 part cycle is to prevent heat soak of turbo during shutdown following a drive. Oil lying in the turbo will cook and cake if this heat is not dissipated. Synthetic oil of correct viscosity is important as well as a operating cool down system.
With a simple wiring addition you as the operator can initiate this
action immediately upon shutdown or even just prior to shutdown and not
effect the normal action. also in the event the system devices fail to
initiate this action you can do so manually until the situation is
repaired. The manual switch is to be located on the parcel shelf under
the steering wheel. relay 22 ( right behind the parcel shelf) controls
the turbo cool down cycle. A temp sensor provides ground
to the relay 22 which has 12vdc present all times. simply add a addition
switched ground line to the relay 22 at the sensor input, see diagram and
you now have manual as well as normal operation.
Complex car the 5000 , possible for any component to fail and drain the battery. before a problem occurs and while everything is ok do a baseline amperage check at the battery positive wire., using a dc amperage CLAMP AROUND meter on the positive battery wire, get several readings, zero out the meter each time......avg them out . Now turn on headlights and get a reading to verify your meter operation, now turn everything off, key out of ignition, take a reading and that is YOUR AUDI amperage draw with key off , your audi.....clock etc radio normal current usage. write down this number and attach to the battery. now you have a baseline number to go by should you suspect some component draining your battery. every car is individual, do to wiring, accessories , connections etc. it should be under 1 amp. should you experience a battery drain problem, connect your meter and begin pulling one fuse at a time until you find the suspect line that brings you back to baseline amperage . now your down to one line, go to each component on that line and unplug components until you find the failed one.
Great original stainless braid lines. Problem is the end fittings are steel and they will rust. If you are lucky you can get the original replacement lines , but even then the cost will be high. You are still dealing with disconnecting rusted steel fittings nearly unaccessible at the oil distributor unit.
Several options for this repair. Remove the oil cooler and oil distributor, hoses attached all as one unit, for bench repair. Of course this also requires you disconnect oil line from distributor to the turbo. In any event do not attempt to disconnect rusted oil lines from the oil distributor while it is on the engine. Clearance on the upper fitting is minimal and you could possible break the oil distributor to engine mounting pins. In the event that even after removing the oil distributor you can not free the coupling fittings you have the option to cut the lines and fit rubber hose to the oil cooler with correct metric 90 degree fittings on the cooler. If the fittings at the oil distributor are in good shape , you can cut the steel lines and fit directly rubber hose. This option allows you to loop extra hose to and from the cooler and in effect increase your overall oil capacity.
Another option is to block off both oil lines at the distributor, fit a oil cooler "adapter plate" on to the oil filter tread mount. These plates fit all oil filters and only move your filter 1/2 inch closer to the road surface. The adapter plate has ports for threaded fittings. In any of these repair options use high quality fittings, hose, and clamps. Disconnect battery and wire to the starter, drain all oil, remove the oil filter, remove the right wheel inner fender plastic liner ( gives access to cooler mounting bolts), use correct hose inner diameter to steel line, and gasket or liquid gasket where required on distributor.