How
to Transfer Files
A step-by-step guide for
transferring
files via FTP and Blackboard Dropbox
Using
FileZilla to transfer files using FTP (File
Transfer Protocol)
Ø
Use
this to upload files to the mail.sas.upenn.edu server for use/viewing
in your
website.
Ø
Open
FileZilla, either using a shortcut button, or from your Program Start
Button.
Ø
If
you have not created a Site Manager exclusive to you, you might want to
do so,
particularly if you plan on having extensive activity (i.e. you are
using it to
populate and maintain documents for a website).
Ø
Go
to “File” and choose “Site Manager”.
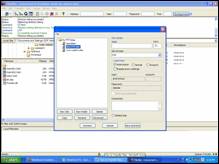
o
Click
the “New Site” button. Type in a name
that will indicate that this Site Manager profile is yours.
o
In
the “Host” field, type in the address of the server with which you will
be
connecting. If you are completing this
for PennSTI, you will be connecting with the “mail.sas” server at
mail.sas.upenn.edu.
o
Choose
the server type. If you are completing
this for a website connected to the mail.sas.upenn.edu server, then
choose
“SFTP using SSH2“ (you will see the port number change from 21 to
22—this is
correct).
o
Choose
“normal” Logontype. This will open the
“Username” and “Password” fields.
o
Type
in the Username and Password that is required for you to gain access to
the
server you have indicated. If you are
connecting with the mail.sas server, then you type in your mail.sas
username
and password.
o
Once
you have completed these actions, click “Save and Exit”.
o
Once
you have created your Site Manager, whenever you open FileZilla, when
you go to
“Site Manager” choose YOUR Site Manager profile, and click “connect” to
access
your files.
Ø
Once
you have connected, you will see your computer’s files on the left-hand
side of
your screen.
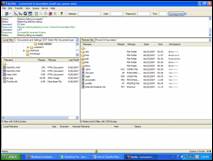
Ø
You
can search for files to upload to the server in the same way that you
would
look for documents on your own computer.
Ø
Once
you have found the file that you wish to upload, either double click
that file,
or “drag-and-drop” the file into the location on the right-hand column
in which
you would like the file to reside. Once
you’ve done that, you’re done! That
document can now be found on the mail.sas server.
Ø
IMPORTANT!
If you are doing this to upload material for
your website, you must remember to load it into your “html” folder!
Using
Blackboard’s Dropbox to Store and Send
Documents
Ø
Log
into your Blackboard account, following the directions in your How to
Use
Blackboard instructions.
Ø
Click
on the link to the course for which you would like to store/send a
document.
Ø
Click
on the “Dropbox” button.
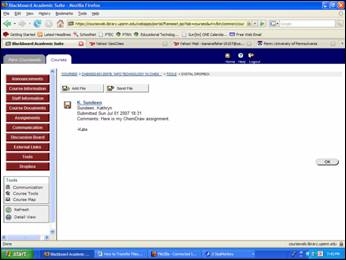
Ø
Click
“Add File”.
Ø
Type
in a name for the file.
Ø
Click
“Browse” to locate the file you wish to upload.
Once you have located it, click on the file and click “Open” to
fill in
the document path into the “File” field.
Ø
Fill
in any comments that you care to append.
Ø
Click
“Submit”.
Ø
Your
uploaded documents will appear in a list.
To access a document in your Dropbox, just click on its name.
Ø
To
SEND a document that is in your Dropbox, click “Send File”. You can either choose one of the items
already in your Dropbox from the “Select File” drop-down menu, or you
can
upload a new file. Once you have chosen
the file to send, click “Submit” and your file will be sent to your
professor.
|
|
K. Sundeen |